Friday, October 19, 2018
Friday, March 16, 2018

Customizing the WordPress Login Page
This tutorial will cover several modifications to theme files that will allow you to create your own personalized login page:- Add a custom background
- Replace the WordPress logo with a custom logo
- Customize the look of the login form
- Change the login logo URL
- Remove the lost password link
- Remove the “Back to” link
- Hide the login error message
- Remove the login page shake
- Change the redirect URL
- Set “Remember Me” to checked
- In your current theme’s folder, create a new folder called “login”
- In the /login folder, create a new .txt file and name it custom-login-styles.css
- Next, we’ll need to tell WordPress to load this CSS file, so open up your theme’s functions.php file and add the following code:
| function my_custom_login() { |
| echo '<link rel="stylesheet" type="text/css" href="' . get_bloginfo('stylesheet_directory') . '/login/custom-login-styles.css" />'; |
| } |
Add a Custom Background
For our WPMU DEV-inspired login page, we’re going to use the racing car image from our homepage (if you can’t remember what it looks like, logout and check out our homepage).We can achieve this by adding the following to our custom-login-styles.css file:
| body.login { |
| background-image: url('home-bg.jpg'); |
| background-repeat: no-repeat; |
| background-attachment: fixed; |
| background-position: center; |
Replace the WordPress Logo With a Custom Logo
The WordPress Codex provides a tidy explanation for how to replace the logo, but since we’ve already created a CSS file we can just add the following to that file:| .login h1 a { |
| background-image: url('login-logo.png'); |
| } |
Save the logo you want to use in your /login folder where your custom-login-styles.css file is also stored.
Don’t forget to replace the file name in line 2 with the name of your own logo file.
First, we’ll style the labels to make the text darker, and the form input boxes to give them a more rounded look:
}
Next, we’ll style the button to make it a lighter shade of blue:
}
While the changes are subtle, they better match the WPMU DEV branding.
add_filter( 'login_headertitle', 'my_login_logo_url_title' );
Customize the Look of the Login Form
Now we’re going to play with the look of the login form so it better matches the WPMU DEV branding, but you can change the CSS however you like to match the look and feel of your own site.First, we’ll style the labels to make the text darker, and the form input boxes to give them a more rounded look:
| .login label { |
| font-size: 12px; |
| color: #555555; |
| } |
|
|
| .login input[type="text"]{ |
| background-color: #ffffff; |
| border-color:#dddddd; |
| -webkit-border-radius: 4px; |
| } |
|
|
| .login input[type="password"]{ |
| background-color: #ffffff; |
| border-color:#dddddd; |
| -webkit-border-radius: 4px; |
Next, we’ll style the button to make it a lighter shade of blue:
| .login .button-primary { |
| width: 120px; |
| float:right; |
| background-color:#17a8e3 !important; |
| background: -webkit-gradient(linear, left top, left bottom, from(#17a8e3), to(#17a8e3)); |
| background: -webkit-linear-gradient(top, #17a8e3, #17a8e3); |
| background: -moz-linear-gradient(top, #17a8e3, #17a8e3); |
| background: -ms-linear-gradient(top, #17a8e3, #17a8e3); |
| background: -o-linear-gradient(top, #17a8e3, #17a8e3); |
| background-image: -ms-linear-gradient(top, #17a8e3 0%, #17a8e3 100%); |
| color: #ffffff; |
| -webkit-border-radius: 4px; |
| border: 1px solid #0d9ed9; |
| } |
|
|
| .login .button-primary:hover { |
| background-color:#17a8e3 !important; |
| background: -webkit-gradient(linear, left top, left bottom, from(#17a8e3), to(#0d9ed9 )); |
| background: -webkit-linear-gradient(top, #17a8e3, #0d9ed9 ); |
| background: -moz-linear-gradient(top, #17a8e3, #0d9ed9 ); |
| background: -ms-linear-gradient(top, #17a8e3, #0d9ed9 ); |
| background: -o-linear-gradient(top, #17a8e3, #0d9ed9 ); |
| background-image: -ms-linear-gradient(top, #0b436e 0%, #0d9ed9 100%); |
| color: #fff; |
| -webkit-border-radius: 4px; |
| border: 1px solid #0d9ed9; |
| } |
|
|
| .login .button-primary:active { |
| background-color:#17a8e3 !important; |
| background: -webkit-gradient(linear, left top, left bottom, from(#0d9ed9), to(#17a8e3)); |
| background: -webkit-linear-gradient(top, #0d9ed9, #17a8e3); |
| background: -moz-linear-gradient(top, #0d9ed9, #17a8e3); |
| background: -ms-linear-gradient(top, #0d9ed9, #17a8e3); |
| background: -o-linear-gradient(top, #0d9ed9, #17a8e3); |
| background-image: -ms-linear-gradient(top, #0d9ed9 0%, #17a8e3 100%); |
| color: #fff; |
| -webkit-border-radius: 4px; |
| border: 1px solid #0d9ed9; |
While the changes are subtle, they better match the WPMU DEV branding.
Change the Login Logo URL
By default, the logo links to wordpress.org. You can change this to point to your own site by adding this code to your functions.php file:| function my_login_logo_url() { |
| return get_bloginfo( 'url' ); |
| } |
| add_filter( 'login_headerurl', 'my_login_logo_url' ); |
|
|
| function my_login_logo_url_title() { |
| return 'Your Site Name and Info'; |
| } |
Replace “Your Site Name and Info” in line 7 with the name of your site. This is simply ALT text for the logo.
To remove the link, add this to your CSS file:
}
Remove the Lost Password Link
The “Lost Your Password?” link is helpful if you’ve lost your password, but if someone has hacked your email they will be able to get hold of your WordPress password and take over your site.To remove the link, add this to your CSS file:
| p#nav { |
| display: none; |
Remove the “Back to” Link
The “Back to…” link lets users return to the homepage of your site. I’m going for a clean look and don’t want to display the text under my form. To remove it, add the following to your CSS file:| p#backtoblog { |
| display: none; |
Hide the Login Error Message
When you enter an incorrect username or password, the login page returns an error message telling you which details you got wrong. If your username is correct but password is wrong, it will say your password was wrong. If you typed the wrong username, it says “Invalid Username.” While the message may be helpful for you, the problem is that hackers can use this information to guess your login credentials and gain access to your website.The easiest way around this is to change the error message with this code in your functions.php file:
| function login_error_override() |
| { |
| return 'Incorrect login details.'; |
| } |
Remove the Login Page Shake
When you enter an incorrect username or password, the login form shakes to alert the user they need to try again.I don’t really mind this feature, but some people find it annoying. To remove the shake, add this snippet to your functions.php file:
| function my_login_head() { |
| remove_action('login_head', 'wp_shake_js', 12); |
| } |
Change the Redirect URL
When you login to WordPress you’re immediately taken to the dashboard. You can easily change this to redirect users to your homepage instead.Add the following code to your functions.php file so that all users other than admin are automatically redirected:
| function admin_login_redirect( $redirect_to, $request, $user ) |
| { |
| global $user; |
| if( isset( $user->roles ) && is_array( $user->roles ) ) { |
| if( in_array( "administrator", $user->roles ) ) { |
| return $redirect_to; |
| } else { |
| return home_url(); |
| } |
| } |
| else |
| { |
| return $redirect_to; |
| } |
| } |
Set “Remember Me” To Checked
The “Remember Me” checkbox is unchecked by default. I like to check this when I login, but sometimes I forget, only to realize afterwards that I forgot and it’s too late. Doh!To leave this box always checked, add this snippet to functions.php:
| function login_checked_remember_me() { |
| add_filter( 'login_footer', 'rememberme_checked' ); |
| } |
| add_action( 'init', 'login_checked_remember_me' ); |
|
|
| function rememberme_checked() { |
| echo "<script>document.getElementById('rememberme').checked = true;</script>"; |
Wednesday, December 6, 2017

Windows 10 includes a limited collection of desktop backgrounds to choose. And, the Windows Spotlight feature, previously limited to Windows 10 Home, became available in the Pro edition via the November Update.
It provides a travel log of stunning background images taken from around the world on your Lock Screen. Many of these are desktop worthy, too. Here’s how you can find and collect those pictures.

Find Windows Spotlight Lock Screen Pictures
Windows Spotlight Images are not stored in the most obvious of places. First, open your user folder, press Windows key + R then type: %userprofile% and hit Enter.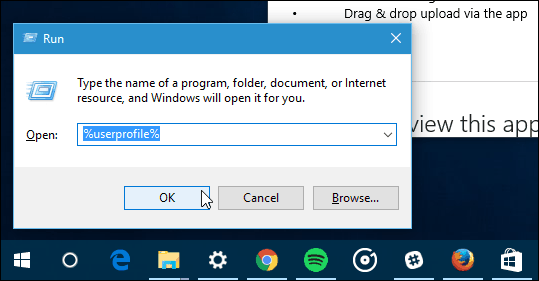
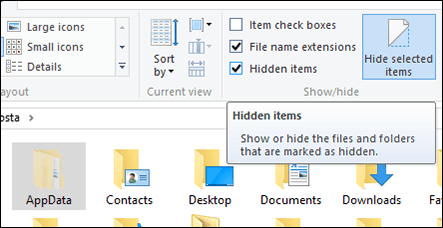
When File Explorer opens up, you’ll need to turn on Show hidden files and folders. Click the View tab then check the box: Hidden items within the Show/Hide group.
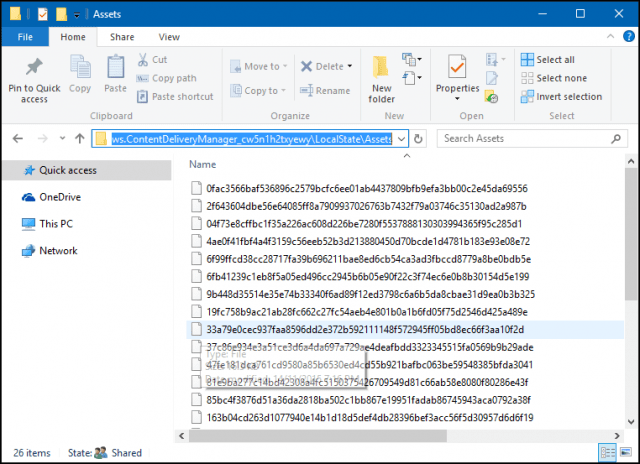
The AppData folder will now appear in your User folder. Open it then navigate to Local > Packages > Microsoft.Windows.ContentDeliveryManager_cw5n1h2txyewy > LocalState > Assets.
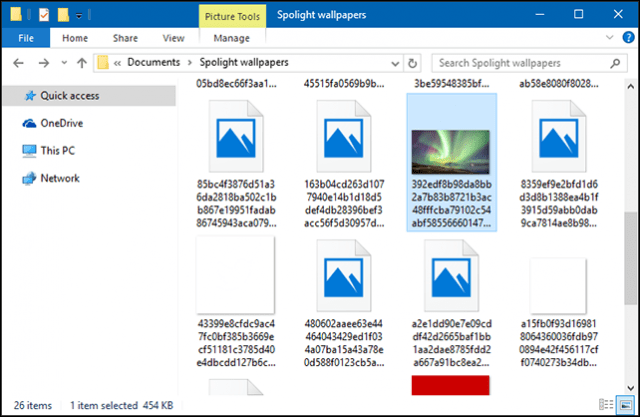
The images will appear as blank files, select all of them Control + A then copy with Control + C. Create a new folder in your Documents folder or on the Desktop then paste the files with Control + V.
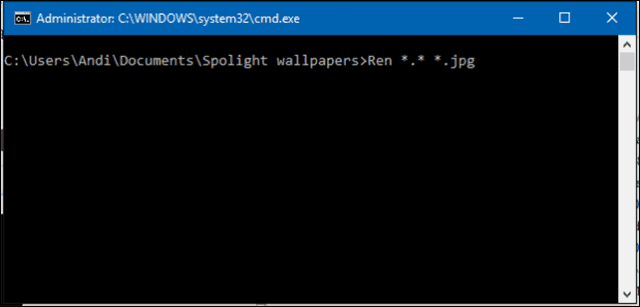
Open the folder containing the blank Files, click File menu > Open Command Prompt > Open Command Prompt as administrator.
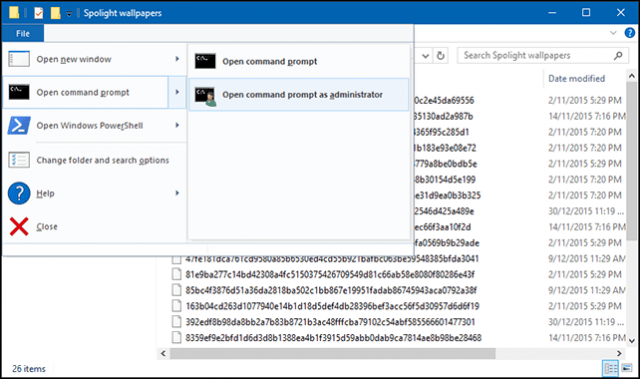
Type the following command: Ren *.* *.jpg then hit Enter. This batch command will convert the blank files to JPEG images and make them visible.
Your mileage might vary, though. I don’t know if it’s because I am using a limited data plan, why I don’t have many of these Spotlight images stored. Some of the files will be asset images, used as resources for app icons; you can delete what you don’t need.
You can periodically check the folder for new images. If you want an easier way to obtain new wallpapers for your desktop, check out our article on how to download and install Windows Themes.
Saturday, October 14, 2017

My Movie Manager පාවිච්චි කරලා ඔයගේ පරිගණකයේ ෆිල්ම් ,ට්වී සීරියස්, ඔක්කොම හරිම පිළිවෙලට තියාගන්න පුළුවන්.තම imdb එකට සම්බන්ධ කරලා ෆිල්ම් වල cover එකත් අරගෙන ලස්සනට තියා ගත්තකි.
හිතන්නකෝ යාලුවෙක්ට ෆිල්ම් දෙන්න ගියාම උනත් ලේසි තොර ගන්න,
මේ තියෙන්නේ එකෙන් කරන්න පුළුවන් දේවල් ටික(features of My Movie Manager:)
- Play කරන්න හරි folder එක Open කරනත් පුළුවන්
- ඔක්කොම basic details බලා ගන්න පුළුවන් ෆිල්ම් එක click කරලා.
- ඔයාට බලපු ෆිල්ම් Mark කරලා තියා ගන්න පුළුවන්, ඒ වගේම බලපු නැති ඒවත් බල ගන්න පුළුවන්.
- Sort the movie (title, year, IMDb rating හරි ඔය දාන rating වලටත්).
- කැමතිම ෆිල්ම් mark කරලා තියාගන්න පුළුවන්,
- rating දෙන වැඩෙත් අපිටම දෙන්න පුළුවන්,නැත්තන් imdb එකේ rating එකත් පාවිච්චි කරන්න පුළුවන්.

තව මේකෙන් ෆිල්ම් වල විස්තර ඉන්ටෙර්නෙට් download කර ගන්න යන්නේ 3 හරි 4 MB හරිම පොඩි ගානක් ඉතින් ඔයාට ඒ ගැන වැඩ වෙන්නේ ඕනේ නැ. එච්චරම
හරිම පොඩි සොෆ්ට්වරේ එකක් මේක ෆ්රී එකක් හන්දා ඔයාලගේ crack ඕනේ වෙන්නේ නැ.
පහල download button එක click කරලා ඔයාට download කරගන්න පුළුවන්.
 |
| MyMovieManager_Setup.rar 4.MB |
Friday, October 13, 2017
Languages: Sinhala
Movie Stars: – Sheshadri Priyasad, Hemal Ranasinghe, Dinakshie Priyasad
Director: – Sameera Wackwella
Movie Quality: DVDRip x264
Movie Size: 850MB
වැදගත්: මෙය අප විසින් අන්තර්ජාලයට නිකුත් කරන ලද්දක් නොවන අතර අන්තර්ජාලයෙන් උපුටා ගෙන අප වෙබ් අඩවියෙන් නොමිලේ නිකුත් කරන ලද්දක් වන අතර පිටපත පිලිබඳ කිසිදු වකීමක් අප දරන්නේ නැත.
| DVDRip | x264 | mp4 | 845MB |
Thursday, October 12, 2017
පරිඝනකයේ වැඩ කරනකොට මදුරුවන්ගෙන් කරදරයි නේද??? මදුරු කොයිල් ඕන නෑ.මෙන්න තියෙනවා software එකක්.පරිඝනකයේ වැඩ කරනකොට මදුරුවන්ගෙන් කරදරයි නේද???
 ඔයාලට හිතේවි මේක බොරුවක් කියල.ඒත් මේක හොඳට වැඩ කරන software එකක්. මදුරුවන්ට ඇහෙන ශබ්ධ තරංග වල පරාසයට අනුව මේක හදලා තියෙන්නේ.ඉතින් මේක ඔයාගේ පරිඝනකයේ install කරලා speaker on කරලා තියන්න.මිනිස් කන් වලට මේකෙන් හානියක් වෙන්නෙත් නැහැ.
මෙය ඉතා කුඩා මෘදුකාංගයක් වන අතර ඕනෑම පරිඝනක මෙහෙයුම් පද්ධතියක ස්ථාපනය කල හැකිය.

මෙය ඉතා කුඩා මෘදුකාංගයක් වන අතර ඕනෑම පරිඝනක මෙහෙයුම් පද්ධතියක ස්ථාපනය කල හැකිය.
1. පළමුව මෘදුකාංගය භාගත කරගන්න.
2. ඉන්පසුව එහි ඇති Activate බොත්තම ඔබා මෘදුකාංගය සක්රීය කරගන්න.
3. මෘදුකාංගය ක්රියාකාරීත්වයේ ඇති අතර ඔබට පරිඝනකයේ වැඩ කටයුතු කල හැකිය.
පහතින් මෙම software එක download කරගන්න.
Sunday, October 8, 2017

නොමිලේ භාණ්ඩ ගෙදරටම ගෙන්න ගන්න පුලුවන්
Headphones,Watches,Sunglasses,Memory Card,Selfie Sticks
ඇතුලු ගොඩක් දේවල් තියනවා මේ Online Shop එකේ
කරන්න තියෙන්නේ සුලු දෙයයි, referral link එකකින් ගිහිල්ල, Register වෙන්න ඕනි..
මෙන්න තියෙනවා ලින්ක් එක :-https://www.retailgenius.com/rf/sajithbu86
ඔයගොල්ලෝ referral Link එකකින් Register උනොත් විතරයි රු.600.00 ක මුදලක් ඔයගොල්ලොන්ගේ Account එකට එන්නේ.ඊට පස්සේ ඔයගොල්ලොන්ගේ Phone එකෙන් Apple App Store/ Google play Store එකෙන් මේ Online Shop එකේ App එක Download කරලා ඒකට Log වෙන්න. Log වෙච්ච ගමන් ඔයගොල්ලොන්ගේ Account එකට තව රු.500.00 ක් ලැබෙනවා.දැන් ඔයගොල්ලොන්ගේ Account එකේ රු.1100.00 ක් ඇති.
SmartPhone එකක් නැත්තන් රු.600.00 ක දෙයක් උනත් ගන්න පුලුවන්!
ඊට පස්සේ ඔයගොල්ලොන්ට කැමති දෙයක් ඒ ගානට ගන්න පුලුවන්.රු. 1100.00 ට වඩා මිලක් තියන භාණ්ඩයක් ගන්නවා නම් ඉතිරි මුදල ඔයගොල්ලොන්ගේ credit card එකෙන් හෝ debit card එකෙන් ගෙවලා ගන්නත් පුලුවන්.
ඇයි මෙයාල මෙහෙම Offer එකක් දෙන්නේ.. පිස්සුද ??
මේ Offer එක තියෙන්නේ ටික කාලයයි. මොකද මේක අලුත්ම Online Shop එකක්. මේ විදිහට තමයි ඒගොල්ලෝ මේ Online Shop එක් promote කරන්නේ.
TV එකේ Advertisement කරනවට වඩා මේ ක්රමේට ඒගොල්ලෝන්ට ලාබයි කියලයි ඒගොල්ලෝ කියන්නේ…මේ Online Shop එක ලංකාවේ එකක්. 100% විශ්වාසයි.

